Polytunnels can be a great investment for gardeners, helping to extend the growing season. They can also allow you to be more self-sufficient by increasing your yield and allowing you to grow more exotic varieties.
If you are considering buying a polytunnel, a kit can be a great way to go and save you hundreds of pounds on installation. Additionally, building a polytunnel from scratch is probably easier than you think – we often say that building a polytunnel is a bit like putting together giant meccano. To build a standard polytunnel kit, you will need an additional pair of hands and some basic tools. Many customers build their tunnels over a weekend, but there are a number of factors that determine how long it takes – the size and specification of the polytunnel, digging conditions, weather, and DIY skills all factor into the time it takes to build a kit.
Follow the instructions set out in this guide to learn how to build a polytunnel DIY style.
DIY Polytunnels
Before you get started, it’s important to carefully read the kit’s instructions and check that you have all the components listed. Providing the ground is reasonably level, the only site preparation you will need to carry out is a simple site clearance. After doing this, you can begin:
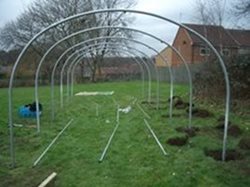 Foundations are the first step. Ensuring each of the foundation tubes is placed correctly is crucial, so take your time marking the positions and ensuring they are correctly and evenly spaced.
Next, placing a wooden block between the tubes and the hammer to avoid damage, drive the foundation tubes into the ground. Alternatively, if building on hard ground like concrete, you will need to drill and bolt base plates into place to hold the polytunnel hoops.
Now you are ready to connect the hoop sections together. These will form the tunnel’s hoop frame structure and can be slid into place over the foundation tubes.
Once the hoops are in position, it’s time to connect the ridge tubes together and install the ridge to the underside of the hoops in the centre. Corner stabilisers are then fixed in position at each corner and, if part of the kit, door rails are placed on the two end hoops.
Lastly, it’s time to put up the timber door frames and hang the doors, making sure they are accurate and straight.
Prepare the Plastic Cover
With the foundations and standard kit construction in place, the next stage is to cover with polythene. This is crucial to the success of your polytunnel as the plastic sheet must be fitted with a taut, drum tight finish in order to avoid storm damage and to provide an optimal growing environment for your crops.
Here is how to cover:
Firstly, check your hoops to ensure there are no rough edges and that any fixings, such as screws, nuts and bolts, are on the inside of the frame – this will prevent damage to the plastic sheeting. Apply anti hot spot tape to the hoops – the smooth surface of the tape allows the cover to be pulled easily over the frame without catching or tearing.
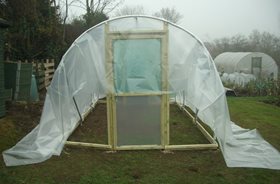 With a helper (or several depending on the size of polytunnel), roll the cover out along the side of the tunnel and pull the polythene over the entire frame, ensuring you have the same overhang down each side and end of the tunnel.
The next step is securing. There are two ways of doing this:
The standard method is to dig a trench around the polytunnel, then bury the polythene in the ground to deliver tension and keep it in place.
Alternatively (and necessary if constructing on hard ground), install a wooden or aluminium base rail around the base of the framework and secure the polythene cover to the base rail using timber battens and nails or PVC infills. (When using this method for fitting the cover, it is important that the foundation tubes are secured into the ground with the use of anchor plates or concrete to prevent the framework from lifting in strong winds).
The polytunnel plastic is secured on the ends of the tunnel by being fitted to the door frames using timber battens and nails.
Preparing Your Polytunnel Interior
With your polytunnel build complete, you can prepare the interior ready for planting. The work required will depend on how you intend to use the space. For example, you could plant directly into the ground, opt for raised beds, or grow in pots.
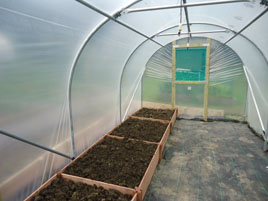 If you choose to plant directly into the ground, break up the soil using a fork and improve its condition using compost. Alternatively, raised beds can offer a variety of advantages such as better accessibility and a higher working point, while growing bags or pots can be moved around, providing a more flexible environment.
When you’ve selected your preferred method and are ready to plant, this RHS guide details all you need to know about more than 50 varieties of fruits and vegetables. While our yearly planner shows you when to sow, plant and harvest.
Further Tips and Advice
Building a polytunnel from scratch can be a rewarding process, allowing you to fulfil your gardening ambitions and grow more of your own veg.
Need some more help with learning about how to build a small polytunnel? Take a look at our construction advice, which covers everything from anchor plates, base plates and base rails, to orientation and relocation. You can also watch our collection of construction videos on our YouTube channel.