Collecting and saving seed from your homegrown fruit and veg is not only extremely rewarding, it is also a great way to approach sustainable gardening and save money. Saving your own veg seed can also help your crops to adapt to local growing conditions and increase yields.
Some plants produce seeds more easily than others and are more likely to produce successful yields. It is easy to save seeds from peas, beans, and tomatoes as these plants have self-pollinating flowers and produce seedlings just like the parent plants. Saving seed from biennial crops, such as carrots and beetroot, requires patience as they take two seasons to produce seed. Other vegetable crops can be trickier when it comes to saving seed – plants such as squashes and pumpkins have male and female flowers and can cross-pollinate, making it difficult to know what you’re going to get.
It is sensible to buy certain seeds. F1 varieties are bred from parent plants to reproduce useful qualities, such as resistance to diseases, but these qualities only last for one growing season and seed from F1 varieties will not reliably replicate those characteristics.
How to save seeds
Seed saving involves:
- Understanding where seeds are found on different plants.
- Choosing seeds from your most suitable, healthy plants with the best fruit.
- Harvesting seeds at the right time.
- Storing seeds in suitable conditions until you are ready to sow them.
Read on to find out how to collect and save seeds from your homegrown crops.
You will need:
- Cloches, fleece, netting, or other coverings to isolate your best and healthiest plants for seed saving and to avoid unwanted cross-pollination.
- Secateurs to collect seedheads.
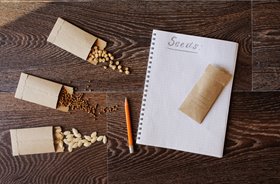
- Paper bags to collect seeds.
- Wire kitchen sieve to separate the seed and chaff (the seed casings and debris).
- Paper towels to dry seeds.
- Paper envelopes and an airtight container for storing seeds.
- A pen to label your seeds correctly, including the name, variety, and date you collected them.
When to collect seeds
Collecting seed involves getting the timing right – you need to know what a specific plant looks like when the seeds are ready to be harvested. You will need to collect seed quickly before the seedheads burst open and seeds are released, scattered in the wind, or spilled onto the ground.
Most seeds are ready to be collected towards the end of the growing season, in mid to late summer or autumn. However seeds of some crops are produced at different times of year.
It is important you understand a specific plant’s lifecycle so that you know when the seed will be mature and ready to collect, as immature seed typically won’t germinate.
How to collect seeds
Biennial crops, including:
- Carrots
- Beetroot
- Leeks
- Parsley
Collecting and saving seed from biennial crops requires patience as they take two seasons to produce seed. In the first season they make leaves and roots, and in the second season they make flowers and seeds. So, leave your best plants in the ground during winter for a seed harvest the following summer.
When the flowers turn brown and dry, cut off the whole seedhead and tip it into a paper bag. Separate the seed and chaff by gently rubbing in a wire kitchen sieve.
Large seedheads, including:
- Lettuce
- Coriander
- Dill
It is time to start collecting seed when the flowers turn into brown seedheads which are drying out. Cover the seedheads with a paper bag until they dry out fully. Snip the whole head off from the stalk and turn it upside down, giving it a little shake to loosen the seeds and allow them to fall into the bag. Separate the seed from the chaff.
Peas and beans:
Peas and beans are some of the easiest seeds to collect. Simply leave some of the pods on your best, healthiest plants and wait for them to turn fully brown and dry. If frost is expected before they are ready, you can take up the whole plant and hang it upside down in a frost-free place to finish maturing.
Pick the pods soon after they dry to avoid them bursting open and scattering seed themselves. Crack open the dried pod and remove the seed to be stored.
Brassicas, including:
- Purple-sprouting broccoli
- Calabrese
- Rocket
- Kale
Brassica plants cross-pollinate easily with each other, so if you want to save seed from one type, you need to make sure that you only let one type of brassica flower at a time. Brassica seeds develop after flowering within green seedpods. Once the seedpods start turning from green to brown, they’re matured. Pods burst open and spill seeds on the ground easily when matured, so it’s best to harvest pods when the seeds inside are just beginning to turn brown – check this by, every so often, taking a pod from the plant so you can check the seeds inside.
Snip the seedpods off and leave to dry on a sheet indoors. Once dry, gently break up the pods to extract the seeds. Separate the seed and chaff by gently blowing over the top and passing through a wire kitchen sieve.
Peppers and squash, including:
- Peppers
- Chillies
- Squash
- Pumpkins
Squash and pumpkin plants produce male and female flowers and will cross-pollinate with each other. Peppers and chillies will also cross-pollinate thanks to bees and other pollinators. To make sure next year’s crop has the same qualities as the parent plant, isolate your best plant with a cloche, fleece, or netting when it comes into flowering. Hand-pollinate flowers from other flowers on the same plant or from other plants of the same variety.
Cut the fruit in half and use a spoon to scoop out the seeds into a sieve. Rinse off any pulp and remove any fibres. Spread the seed out on paper towels to dry. Leave in a cool, dry place and, for the first few days, turn the seeds over so they dry on each side.
Tomatoes:
Most tomatoes are self-pollinating therefore produce seedlings identical to the parent plant. If you want to save tomato seeds, be sure to choose open-pollinated varieties – not F1 varieties which will not reliably replicate the parent plant characteristics.
Pick tomatoes off the plant when they are very ripe. Cut them in half and scoop out the seeds into a jar of water. Leave to soak for four or five days – at this stage a mould will have developed which helps to remove the jellylike coating on the tomato seed. Pour the seeds into a sieve and rinse the jelly off thoroughly. Spread the seed out on paper towels to dry.
How to store seeds
Most seeds should be dried thoroughly before they are stored away, but it is always worth checking if the seed from your chosen crop requires anything different. Dried seeds are best stored in paper envelopes, in an airtight container, in a cool dry place.
It’s important to label your seed envelopes clearly, including the name, variety, and date you collected them, so you know which seeds you are sowing when the time comes.
Storing and labelling seeds correctly also helps you to evaluate how successful your seed-saving from each plant has been.
Seed swap
Seed swaps can be exciting events among veg growers and allotment holders. Seed swapping allows you to share your favourite, most tasty variety in exchange for something new or a crop that grows particularly well in your area.
By collecting and saving seed from your best and healthiest plants, you can be sure to share high quality seeds that you would confidently sow yourself.
Make sure you’re swapping seeds with other growers that are prepared and clean, and in clearly labelled envelopes or packaging.
Why save seed?
Gardeners save seed from their homegrown fruit and veg crops for many reasons. Many do it to have control over their food and save money. Others save seed as part of their sustainable lifestyle. Some do it to help their crops adapt to local growing conditions and increase yields. Some growers save seeds to keep up their supply of varieties which may no longer be available. Some gardeners collect and save seed to preserve a link to the past, growing crops their parents and grandparents grew.
As you can see, there are lots of reasons to start saving seeds and there are plenty of plants you might grow in your vegetable garden that are easy to save seeds from.
Check out
our growing guides to help you get the most out of your crops and grow healthy plants worthy of saving seeds from!